
How to Install SPD Cleats (2022 Ultimate Guide)
The cleats should always be put on by you if you have new cycling shoes. Cleat placement can affect how much you enjoy cycling, despite the fact that installing cleats may seem like a simple task. When you know how to do it, adjusting a cleat is simple.
Thankfully, installing and adjusting your cleats is not too difficult. You only need new cleats; no other equipment is required. You can get started immediately if you already know exactly where your new cleats should be. Read the article if you want to learn more about how to install the different types of cleats and how to install the clears on different cycling shoes.
Table of Contents
What Are SPD Cleats and How Do They Work?
In order to physically lock you to the bike, these cleats fasten to the bottom of the sole of your cycling shoes and then connect to the pedal. This results in increased power and efficiency from the energy in your legs because every movement of your leg directly transfers to the pedal.
One of the designs—and the most common—are SPD cleats. However, the cleat does not come pre-installed in SPD-style shoes, and for someone unfamiliar with the sport, the instructions can be challenging. Here is a brief explanation of how to attach SPD cleats to your mountain bike shoes.
The Difference Between Cycling Cleats for Road Bikes and MTB
First off, it’s important to understand that road bike shoes need a different type of cleat than MTB shoes. And that you need to make sure the cleats fit on your shoe and your pedal. You can use the same steps to change the cleats on your road or mountain bike because the procedure is very similar.
Three bolts are almost always used to secure the road bike shoe cleat.
Three bolts (almost always) hold a road bike shoe cleat to the shoe. This is true of cleats made by companies like Shimano SPD-SL, Look Keo and Time. Despite having 4 bolts, Speedplay cleats come with an adapter for 3-hole cycling shoes.
Two bolts hold down an MTB cleat.
Two bolts are always used to secure the cleats on MTB cycling shoes. Crankbrothers, Time, Ritchey, Shimano SPD-PD, Look, and Ritchey are a few other companies that make cleats for mountain bike shoes. In comparison to road bike shoes, the mountain bike cleat is significantly smaller.
How to Install Shimano SPD Cleats?
Both SPD and SPD-SL cleats are compatible with Shimano. Let’s first look at how to install Shimano SPD cleats before moving on to SPD-SL cleats.
Only the quantity of holes separates the two cleats. SPD have only two holes, that’s why they are known as “Two-bolt cleats”.
While SPD-SL cleats have three holes and they are also called “Three-bolt cleats”.
How to Install Shimano SPD Cleats?
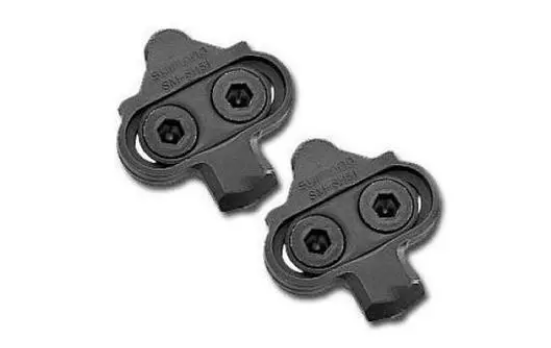
Shimano SPD cleats can be installed on your own by following these steps. Let’s get right into it;
Step 1: Put the cleat before the cleat adapter on the sole of the shoe
Step 2: Tighten them with the cleat mounting bolts using a 4 mm hexagon wrench
Step 3: Loosen the bolts a little so you can adjust your cleat position
Step 4: Adjust the cleat position by moving it a little bit left and right or forward and backward ( you may not find the perfect placement that easy)
Step 5: Use the 4 mm hexagon wrench once more to tighten the bolts after you’ve located the sweet spot.
How to Install Shimano SPD-SL Cleats?
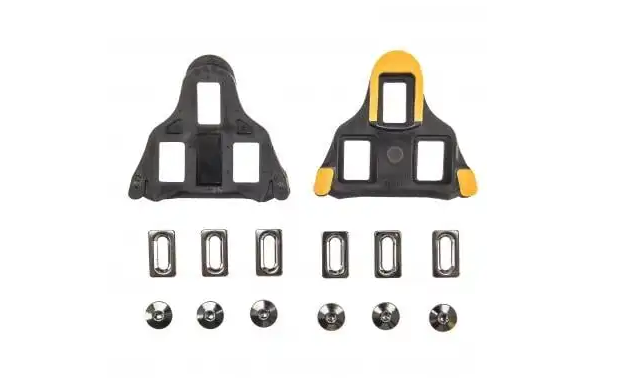
A 4 mm Allen wrench is required to install SPD-SL cleats on Shimano shoes. Let’s go over the step-by-step guide :
Step 1: In case you had other cleat before, unscrew the screws to detach the cleat
Step 2: Make sure to clean the area, then position the washers in the cleats holes facing the flat side up
Step 3: Put the three screws in place and use the 4 mm Allen wrench to tighten them
Step 4: Before you tighten the screws all the way, make sure that the cleats are both lined up
Step 5: Until the screws are completely tight, begin tightening them once more. This enables you to enjoy fantastic rides and prevents screw loss while riding.
If you want to see how things are done in greater detail, you can watch this video right here.
After learning how to install Shimano cleats, let’s examine how to do so on various bikes.
Read more: Shimano SPD vs SPD-SL Pedals – Which One to Choose – Home Run Guide
How to Install SPD Cleats on Mountain Bike Shoes
Cleat installation can be a little tricky, but you’ll find that being able to do it on your own gives you a lot of confidence!
A 4 mm hex wrench, also known as an Allen key, is required.
Attaching the Cleat
Your SPD cleat-compatible cycling shoe has two slots on the bottom, about one-third of the way down the shoe. You’ll notice that a metal base plate with two or four holes is located beneath these slots. You will cleat to this in this location.
The two holes in the base plate should be lined up with the cleat’s position. the plate with two holes known as the cleat adaptor should then be placed on top of the cleat. To ensure that the bolts sit flush with the cleat when they are tight, the adaptor’s recessed holes should face up. Both the left and right shoes have the same cleats.
The bolts should be inserted through the cleat adaptor and cleat so that they rest in the base plate’s holes. To tighten the bolts a few turns, but not all the way, use a 4 mm hex wrench.
Positioning the Cleat
Once the cleat is secured to your shoe, you must position it correctly for the best possible pedaling. The cleat can be turned from left to right and forward to back. Additionally, you can change where the front of the cleat points is.
Here is a good starting position that will work for most people:
- Put the cleat in line with the ball of your foot to determine the proper forward-to-back positioning (it can be helpful to mark the location of the ball of your foot on the edge of your shoe with a ballpoint pen).
- In order for the cleat to be equally spaced from the sides of the shoe’s edge, it must be centered on the sole.
- Aim for the cleat’s point where your big toe will be in your shoe (again, you might want to mark the edge of your shoe where your big toe is).
Securing the Cleat
Using the 4 mm hex wrench, tighten the bolts once you’ve secured the cleats in the proper position. When attempting to clip out of your pedals, you’ll want to make sure it’s tight so that the cleat doesn’t twist.
How to Position Your Cleats for Mountain Biking With Clipless Pedals
You can slide and reposition cleats on your shoe, which is one of their features. This gives you the flexibility to choose where your feet are placed and allows you to choose the position that will allow you to use your leg muscles the most effectively.
A common misconception holds that the cleat should be placed very far forward, under the foot’s ball, and that doing so is a good idea if you want to move quickly. However, stability and endurance are equally crucial for mountain biking, and changing the cleats can have a significant impact on these factors.
From a biomechanical perspective, considering our muscle structure, having the cleat further back reduces the strain on our calf muscles while cycling. As you aren’t putting additional strain on your legs, you can pedal more effectively and for a longer period of time, enabling you to travel much farther. As you will be using your quads more while cycling than your calves, which are less important overall for the activity, it will also increase stability.
Does this imply that the cleats should be fully repositioned? Your heel will naturally drop down if you have the cleat further back, which will increase your bike’s stability. When riding on steeper, trickier terrain, you’ll notice it especially.
However, as was already mentioned, everyone cycles a little bit differently. For you, having cleats on the back might not be as effective. Increasing these factors won’t help you if you already have excellent natural stability and endurance. Because of this, it is generally advised to keep the cleats anywhere from the middle to the back when you aren’t looking to make any sacrifices for speed. To find the best position for you, experiment with various adjustments.
How to Install SPD Cleats on Road Bike Shoes?
By demonstrating how to install SPD cleats, we’ll conclude this article. So let’s get right to it.
Here are the steps you will have to follow to install spd cleats on road bike shoes;
Step 1: Take out the insert of your shoe to get access to the plate inside
Step 2: Place that plate face down, line up in the cut-up holes
Step 3: Put the cleat on the plate from the other side of the shoe
Step 4: Then use a 4 mm Allen wrench to tighten up the screws, but leave it a little loose so you can adjust the cleats
Step 5: Choose your preferred location for the cleats, then tighten each screw until the cleats won’t budge.
Replacing Your Cleats in 10+1 Steps
Are you putting in new cleats, and were you happy with the placement of your old cleats? If so, before removing the cleat, mark the outside of the old cleat on the bottom of your shoe with a pen. This will enable you to install the replacement cleat in precisely the same place. You can frequently recreate the placement with MTB shoes by using the imprint of your old cleats.
Do you have brand-new cycling shoes that you can put cleats on? By using the procedures outlined above, you can then determine the three positions.
- Begin by unscrewing the bolts
- Remove the old cleat
- Give the shoe sole and the holes for the bolts a good cleaning
- Grease the new bolts with assembly paste or Loctite
- Put the new cleat in place
- Turn in the bolts by hand
- Put the cleat in the correct position
- Tighten one bolt a bit, then the second one, then the third one; repeat
- If you have carbon shoe soles, use a torque wrench for the last turns
- Remove any remaining assembly paste
- Make a test ride!
Following Up: Adjust to get the Best Position
You might discover that your new cleats need to be adjusted again after you’ve pedaled with them. Your knees and toes should be in line with your cleat position, and you shouldn’t feel any stress on your joints as you pedal.
The best way to ensure you’re in the right position is to use a certified bike fitter. Asking for assistance from your neighborhood bike shop or an indoor cycling instructor is also a good idea.
Once the cleats are in the proper position, apply a small amount of grease to each of the captive nuts on the bottom of your shoe, and then tighten the bolts to the recommended torque setting of 5–6 Nm (43-52 IN LB) according to Shimano. The grease prevents the bolts from seizing in place, and using the recommended torque setting ensures that the bolts are sufficiently secure but not overtightened, which could harm your shoes or the bolt.